Blender guide · · 8 min read
Bake normal and AO maps in Blender: high poly to low poly
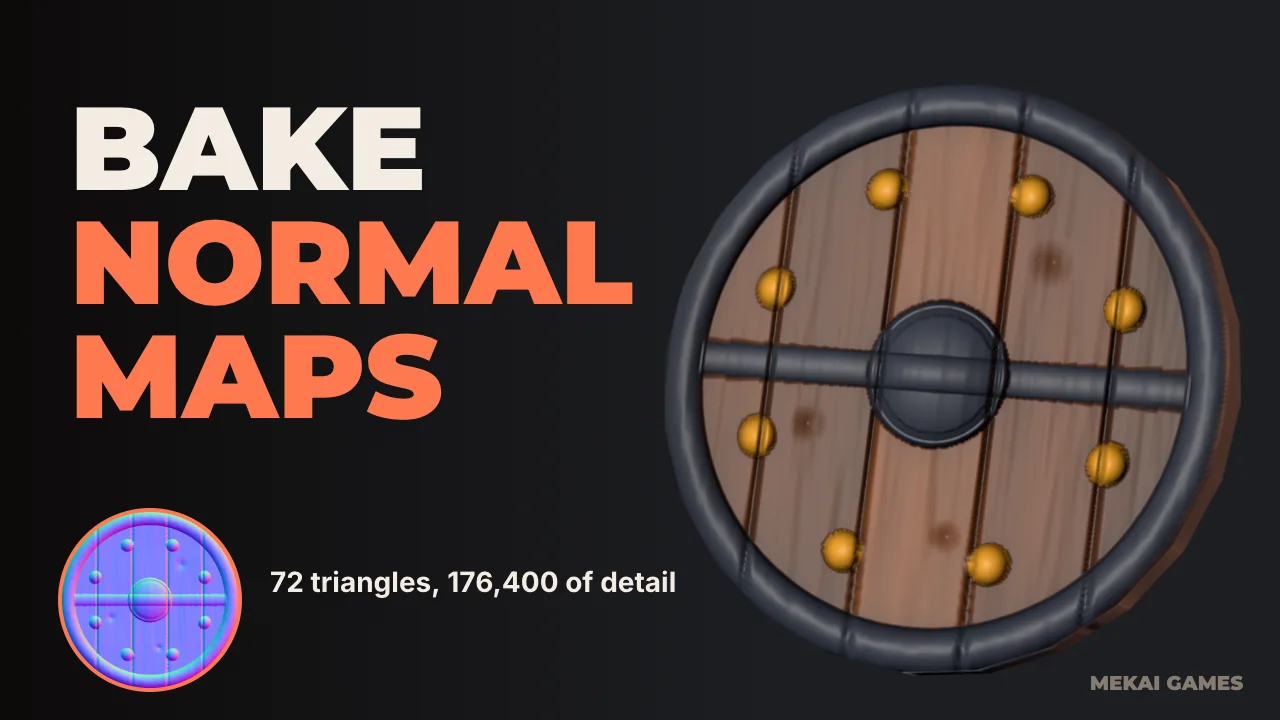
Bake normal and AO maps from a 176,400 triangle shield onto a 72 triangle one in Blender 5.2, with the extrusion settings and the mistakes that break a bake.
What does baking a normal map do?
It stores the surface detail of a high poly model in a texture, so a low poly model can fake it with lighting. In the animation the same shield is shown three ways while one light circles it: the left one is the 72 triangle shield with only a colour map, the middle one is the same 72 triangles with a baked normal map and a baked AO map, and the right one is the 176,400 triangle model the maps came from.
Look at the studs and the planks. The left shield is flat whatever the light does. The middle one reacts like the right one, because each pixel of the normal map tells the lighting which way that bit of surface faces. What it cannot fake is the outline: the edge of the middle shield is still a flat 24-sided disc.
Everything in this guide was run in Blender 5.2 through Python. The numbers (triangles, seconds, values) are read from that run, on one Mac with Cycles on the CPU.
How do you set up a high poly to low poly bake?
You need three things before you press Bake: a low poly model with UVs, a high poly model in the same place, and a blank image to bake into. The low poly shield is a 24-sided disc with a centre vertex, UV mapped flat from above so the face fills the 0 to 1 square. The high poly one is the same disc sculpted into planks, grooves, 8 studs, a boss, a strap and a rim.
Cycles does the baking, so switch the render engine to Cycles first. Then in Render Properties open the Bake panel, set Bake Type to Normal, turn on Selected to Active, and use Normal Space Tangent. Tangent space is the one a game engine expects, because the map still works when the model is rotated or animated. Object space maps only suit things that never move.
Selection is the part that goes wrong most. Select the high poly first, then the low poly last so it is the active object. Add an Image Texture node to the low poly material, load the blank image into it, and leave that node selected and active. Blender writes the result into the active image node, and it reports an error, or writes into the wrong image, if the wrong node is active.
Save the baked image to disk yourself (Image, Save As). A baked image is only in memory until you do, and it is lost when you close Blender.
scn = bpy.context.scene
scn.render.engine = 'CYCLES'                 # baking needs Cycles
b = scn.render.bake
b.use_selected_to_active = True              # high poly (selected) onto low poly (active)
b.cage_extrusion = 0.15                      # higher than the tallest detail
b.max_ray_distance = 0.0                     # 0 = no limit
b.margin_type, b.margin = 'EXTEND', 16
b.normal_space = 'TANGENT'
b.normal_r, b.normal_g, b.normal_b = 'POS_X', 'POS_Y', 'POS_Z'   # OpenGL style, what Blender and Godot use

img = bpy.data.images.new('normal', 1024, 1024)
img.colorspace_settings.name = 'Non-Color'
node = low.active_material.node_tree.nodes.new('ShaderNodeTexImage')
node.image = img
low.active_material.node_tree.nodes.active = node    # the bake goes into the ACTIVE image node

high.select_set(True); low.select_set(True)
bpy.context.view_layer.objects.active = low          # low poly is the active object
bpy.ops.object.bake(type='NORMAL')
What are cage extrusion and max ray distance?
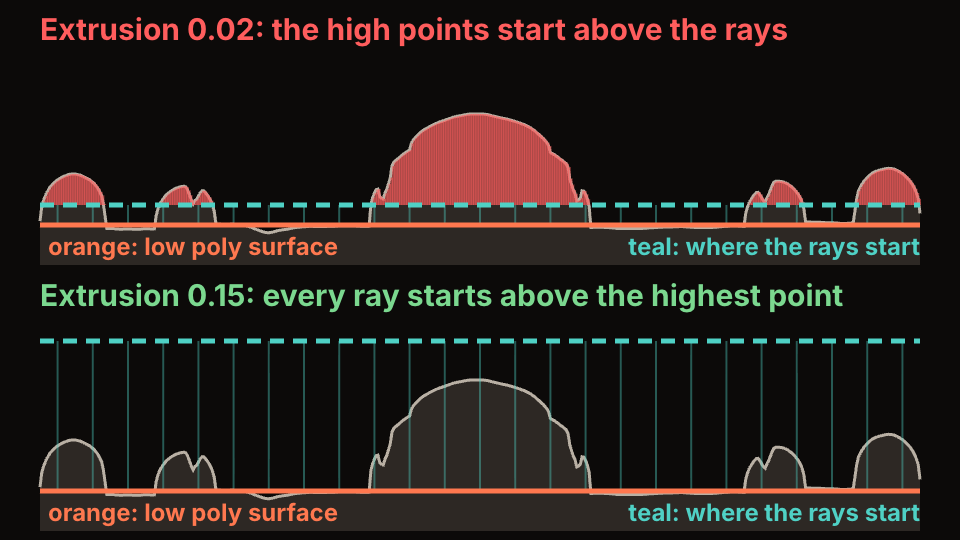
Extrusion sets how far above the low poly surface each ray starts. Each pixel of the map fires a ray from that start point down toward the low poly surface, and records the first high poly surface it hits. Anything that rises above the start point is invisible to its own ray, so it is missed.
The chart is drawn from the real heights of the high poly shield along a line through the boss and one stud. The boss peaks 0.111 m above the low poly face. With Extrusion 0.02, the tops of the boss, the studs and the rim sit above the ray start, and the bake comes out with holes there. With 0.15 every ray starts above the highest point.
Do not just push the number up forever. A very large extrusion lets rays start so far away that they can hit another part of the model first, such as the underside of a rim. Set it to a little above your tallest detail, and use Max Ray Distance (0 means no limit) when parts of the model sit close together.
The Cage option is the next step up. It lets you use your own inflated copy of the low poly mesh as the ray start, which helps when the shape is not flat, for example a rounded helmet where one extrusion value cannot fit both the nose and the cheek. For a flat prop like this shield, Extrusion alone is enough.
How do you bake ambient occlusion?
Change Bake Type to Ambient Occlusion, use a new blank image and bake again, with the same Selected to Active setup. Blender computes the occlusion on the high poly surface, so the dark lines in the planks' grooves and around the studs come from real geometry the low poly does not have. It was the slowest bake here: 12 seconds for 128 samples at 1024 by 1024, against 0.4 seconds for the normal map.
The mistake most people make is too few samples. At 4 samples the map is full of grain that shows up as dirty speckle on the model. Use 128 for a final bake and 16 while testing. The Cycles Samples value in Render Properties controls it.
Use AO to darken the colour, not to replace lighting. In the low poly material multiply the colour map by the AO map before it goes into Base Color, as the middle shield in the animation does. In an engine, assign the map to the Ambient Occlusion slot of the material and keep the colour texture clean.
Which colour space and format do the maps need?
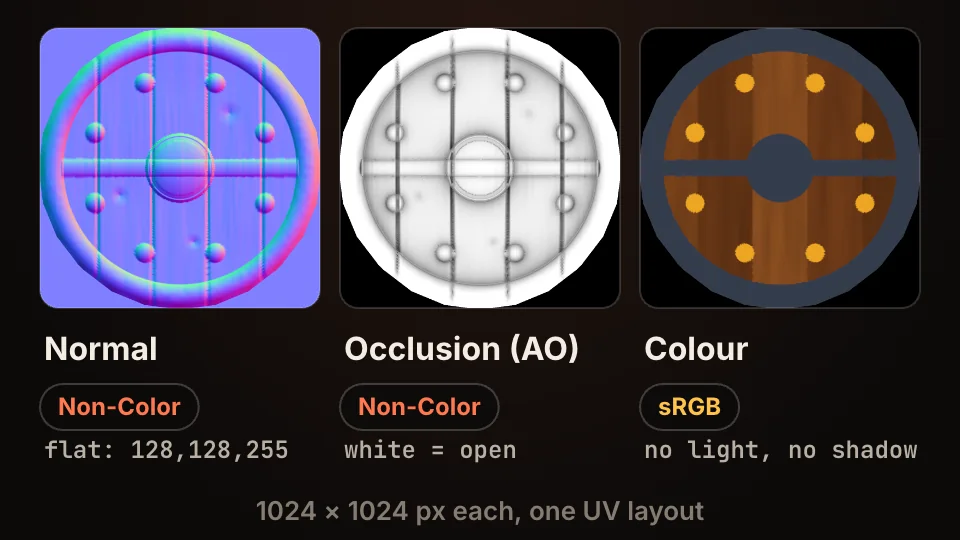
Colour maps are sRGB. Normal maps and AO maps are data, so they must be Non-Color. If a normal map is read as sRGB, the values get a gamma curve applied, the flat areas stop being a neutral (128, 128, 255) and the whole surface tilts. It is the most common reason a good bake looks wrong in the renderer.
A flat part of the normal map is exactly (128, 128, 255), the pale purple blue in the picture, because it means "straight out of the surface". Slopes tint it red and green. The red channel is the X direction and green is Y.
Use PNG for all three maps. JPEG compression smears the normal vectors and shows as blocky shading. For a mobile game, 512 by 512 is often enough for a prop this size, and the normal map is the one that compresses worst, so check it after your engine compresses it.
What goes wrong, and how do you fix it?
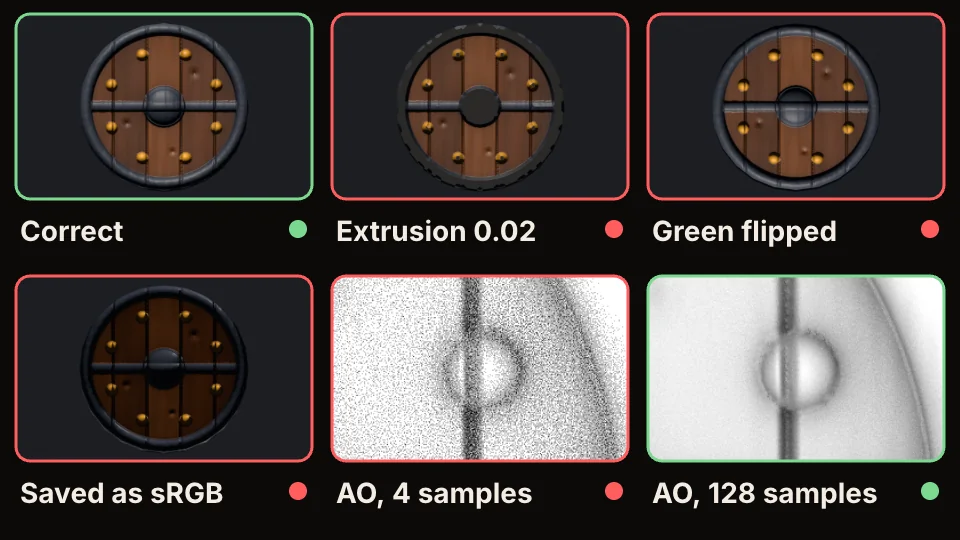
Four failures cover most bad bakes, and the renders show each one on this shield, lit from above. Holes at the studs and boss mean the Extrusion is too small. A normal map where bumps look like dents, or lit from below, means the green channel is flipped: bake with Y set to +Y for OpenGL, or invert green if the file came from a DirectX-style tool. A washed-out, flat look means the image was imported as sRGB instead of Non-Color. Grainy shadows mean not enough AO samples.
Two problems the pictures do not show. Overlapping UV islands make two parts of the model bake into the same pixels, so one wins. And a margin that is too small leaves a seam where the edge of a UV island blends into the empty background: 16 pixels with Extend is plenty for a 1024 map.
When a bake is wrong, change one thing and rebake. Do not tweak three settings at once, because every bake takes seconds and you will not know which one fixed it.
How do you use the maps in Godot?
Godot expects OpenGL style normal maps, with X+, Y+ and Z+, according to its material documentation, which is what the settings above produce. If you bring in a map from a DirectX-style tool, flip its green channel first.
Put the colour map in Albedo, the normal map in the Normal Map slot, and the AO map in Ambient Occlusion. Export the low poly model with its UVs. If you are not sure how the importer handles materials and textures, the Blender to Godot export settings guide goes through it. Check the result with a light that moves, because a normal map looks fine under a light that does not.
If your model uses a trim sheet or shared texture, plan the UVs first: the UV unwrapping guide covers islands, texel density and packing, and the low poly workflow explains how many triangles the low poly side should have. I did not test the maps inside Godot for this article, only the Blender side.
Questions people ask
- Why is my baked normal map all one purple colour?
- Usually the rays missed the high poly, so nothing was recorded. Check that the high poly is selected and the low poly is active, that Selected to Active is on, and that the Extrusion is larger than your tallest detail.
- Do I need to bake in Cycles?
- Yes. The Bake panel is part of Cycles, so switch the render engine to Cycles before baking. You can use any engine, such as EEVEE, to display the result afterwards.
- Should the normal map be OpenGL or DirectX?
- Use OpenGL (Y+) for Blender and Godot. DirectX style (Y-) is used by some other engines and tools. If the bumps on your model look like dents, the green channel is flipped.